Categories
- Advanced Guitar (7)
- Beginner Guitar (22)
- Contest (7)
- Course Walk Through (8)
- Fingerstyle (3)
- Gear (5)
- Gibson (9)
- Gibson's Learn & Master Guitar (74)
- Guest (5)
- Guitar Gathering (8)
- Guitar Tips (34)
- Guitar Video (22)
- Guitarists (9)
- In-Studio (1)
- Intermediate Guitar (17)
- Maintenance (3)
- Mobile App (4)
- Monthly Video Tip (21)
- Playing Technique (5)
- Sale (4)
- Student Profile (22)
- Student Support Forum (17)
Archives
- April 2025(1)
- March 2025(1)
- February 2025(1)
- January 2025(1)
- December 2024(1)
- November 2024(1)
- October 2024(1)
- September 2024(1)
- August 2024(1)
- July 2024(1)
- June 2024(1)
- May 2024(1)
- April 2024(1)
- March 2024(1)
- February 2024(1)
- January 2024(1)
- December 2023(1)
- November 2023(1)
- October 2023(1)
- September 2023(1)
- August 2023(1)
- July 2023(1)
- June 2023(1)
- May 2023(1)
- April 2023(1)
- March 2023(1)
- February 2023(1)
- January 2023(1)
- December 2022(1)
- November 2022(1)
- October 2022(1)
- September 2022(1)
- August 2022(1)
- July 2022(1)
- June 2022(1)
- May 2022(1)
- April 2022(1)
- March 2022(1)
- February 2022(1)
- January 2022(1)
- December 2021(1)
- November 2021(1)
- October 2021(1)
- September 2021(1)
- August 2021(1)
- July 2021(1)
- June 2021(1)
- May 2021(1)
- April 2021(1)
- March 2021(1)
- February 2021(1)
- January 2021(1)
- December 2020(1)
- November 2020(1)
- October 2020(1)
- September 2020(1)
- August 2020(1)
- July 2020(1)
- June 2020(1)
- May 2020(1)
- April 2020(1)
- March 2020(1)
- February 2020(1)
- January 2020(1)
- December 2019(1)
- November 2019(1)
- October 2019(1)
- September 2019(1)
- August 2019(1)
- July 2019(1)
- June 2019(1)
- May 2019(1)
- April 2019(1)
- March 2019(1)
- February 2019(1)
- January 2019(1)
- December 2018(1)
- November 2018(1)
- October 2018(1)
- September 2018(1)
- August 2018(1)
- July 2018(1)
- June 2018(1)
- May 2018(1)
- April 2018(1)
- March 2018(1)
- February 2018(1)
- January 2018(1)
- December 2017(1)
- November 2017(1)
- October 2017(1)
- September 2017(1)
- August 2017(1)
- July 2017(1)
- June 2017(1)
- May 2017(1)
- April 2017(1)
- March 2017(1)
- February 2017(1)
- January 2017(1)
- December 2016(1)
- November 2016(1)
- October 2016(1)
- September 2016(1)
- August 2016(1)
- July 2016(1)
- June 2016(1)
- May 2016(1)
- April 2016(1)
- March 2016(1)
- February 2016(1)
- January 2016(1)
- December 2015(1)
- November 2015(1)
- October 2015(1)
- September 2015(1)
- August 2015(1)
- July 2015(1)
- June 2015(1)
- May 2015(1)
- April 2015(1)
- March 2015(1)
- February 2015(1)
- January 2015(1)
- December 2014(1)
- November 2014(1)
- October 2014(1)
- September 2014(1)
- August 2014(1)
- July 2014(1)
- June 2014(1)
- May 2014(1)
- April 2014(1)
- March 2014(1)
- February 2014(1)
- January 2014(1)
- December 2013(1)
- November 2013(1)
- October 2013(1)
- September 2013(1)
- August 2013(1)
- July 2013(1)
- June 2013(1)
- May 2013(1)
- April 2013(1)
- March 2013(1)
- February 2013(1)
- January 2013(1)
- December 2012(1)
- November 2012(1)
- October 2012(1)
- September 2012(1)
- August 2012(1)
- July 2012(1)
- June 2012(1)
- May 2012(1)
- April 2012(1)
- March 2012(1)
- February 2012(1)
- January 2012(1)
- December 2011(1)
- November 2011(1)
- October 2011(1)
- September 2011(1)
- August 2011(1)
- July 2011(1)
- June 2011(1)
- May 2011(1)
- April 2011(1)
- March 2011(1)
- February 2011(1)
- January 2011(1)
- December 2010(1)
- November 2010(1)
- October 2010(1)
- September 2010(1)
- August 2010(1)
- July 2010(1)
- June 2010(1)
- May 2010(1)
- April 2010(1)
- March 2010(1)
- February 2010(1)
- January 2010(1)
Course Walk-Through: Session 4 - Notes on the 5th & 6th Strings
Friday, February 18, 2011We're already onto our 4th session in the course walk through! After about 2-3 weeks in Session 3 (20-30 minutes of practice a day), you should be ready to advance to Session 4. This session will focus on the final two strings, as well as give a good overview of all strings. (est. time: 2 weeks)

Notes on the 5th String
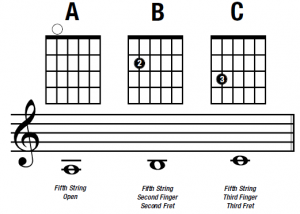
The last two strings both have three notes per string in the first position. The 5th string, or A-string (played open, the note on this string is an A), has A, B and C. A is played without any fingers (or open), the B is played with the second finger on the second fret and the C is played with the third finger on the third fret. Notice the notes on the staff go below the bottom line. It can get tricky reading these lower lines and keeping them straight, but with practice, you'll learn them.
Notes on the 6th String

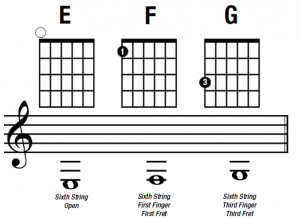
The 6th string is the lowest string on the guitar. When played open, it plays a low E, which is the lowest note on the guitar. The other two notes are the F, played with the first finger on the first fret, and the G, played with the third finger on the third fret. This string is commonly called the 'Low E String' because if you recall the notes on the first string (also the E string), the notes and the finger placements are the same. Both are E strings and they basically mirror each other, except one is much lower!
Scales
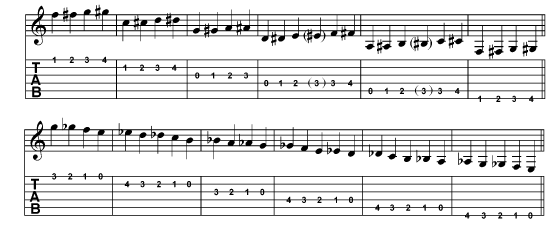
Now that you know all the notes on all the strings, a great warm up and regular pre-playing routine to get into is playing through a scale. The scale will help you play through all the notes in the first position and will also help your fingers remember their place. Many great guitarists warm up by going through scales. Here's the basic scale with the tab below:

The best thing you can do in this session before moving on is to memorize all the notes on each string and be able to play through them without hesitation.
A quick note (haha!) on sharps and flats...
Sharps and flats alter the note one half-step (one fret). The sharp RAISE the note a fret and the flat LOWERS the note a fret. If you have a sharp, you simply move up one fret to play it. For example, on the first string F (first finger, first fret), to play an F#, you simply move to the second fret with your second finger! Here is the sharp and flat scale:
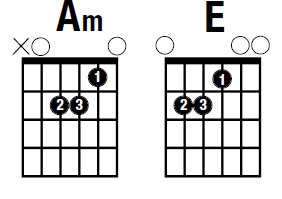
 One of the cool things about Session 4 is that we learn two chords! I know you've been waiting to play chords, and in Session 5, that's all we do. But for now, here's two common and simple chords you can start practicing...the Am (A minor) and E:
 The circles above the chord chart means that string is played open. The X means you don't play that string. The chart corresponds with the fret board. Low E string is on the left and high E on the right. The solid circles with the numbers represent where your fingers are to be placed. For example, on the Am, your first finger goes on the second string, first fret. Your third finger goes on the third string, second fret. And your second finger goes on the fourth string, second fret.
Practice these chords each time you are practicing your 5th and 6th string notes and you'll be ready for Session 5 in a couple of weeks!
 Support Forum